Rear Automatic Temperature Control (ATC) — If Equipped
The rearATC system has floor air outlets at the rear of the right side sliding door, and overhead outlets at each outboard rear seating position. The system provides heated air through the floor outlets or cool, dehumidified air through the headliner outlets.
The rear system temperature control is on the front ATC panel located on the instrument panel.
Pressing the Rear Temperature Lock button on the front ATC panel, illuminates a lock symbol in the rear display.
The rear temperature and air source are controlled from the front ATC panel.
Rear second row occupants can only adjust the rear ATC control when the Rear Temperature Lock button is turned off.
The rear ATC system is located in the headliner, near the center of the vehicle.
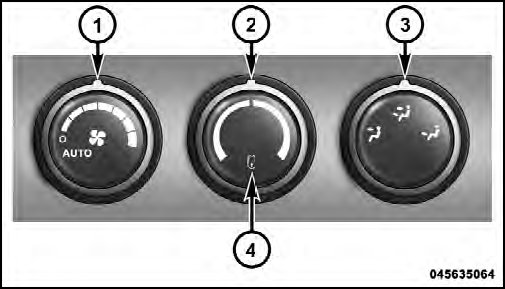
Rear ATC Control Features
1 - Blower Speed
3 - Rear Mode
2 - Rear Temperature
4 - Rear Temperature Lock
1. Press the Rear Temperature Lock button on the front ATC panel. This turns off the Rear Temperature Lock icon in the rear temperature knob.
2. Rotate the Rear Blower, Rear Temperature and the Rear Mode Control knobs to suit your comfort needs.
3. ATC is selected by adjusting the rear blower knob counterclockwise to AUTO.
Once the desired temperature is displayed, the ATC System will automatically achieve and maintain that comfort level. When the system is set up for your comfort level, it is not necessary to change the settings. You will experience the greatest efficiency by simply allowing the system to function automatically.
NOTE:
• It is not necessary to move the temperature settings for
cold or hot vehicles. The system automatically adjusts
the temperature, mode and fan speed to provide
comfort as quickly as possible.
• The temperature can be displayed in English or Metric
units by selecting the “Display Units of Measure in”
customer-programmable feature. Refer to the “Electronic
Vehicle Information Center (EVIC)—Customer-
Programmable Features” in this Section.
See also:
PARK
This range supplements the parking brake by locking the
transmission. The engine can be started in this range.
Never attempt to use PARK while the vehicle is in
motion. Apply the parking brake wh ...
Sunroof Fully Closed
Press the switch forward and release to ensure that the
sunroof is fully closed. ...
Base System
The TPMS uses wireless technology with wheel rim
mounted electronic sensors to monitor tire pressure levels.
Sensors, mounted to each wheel as part of the valve
stem, transmit tire pressure readi ...