Remote Control
Remote Control
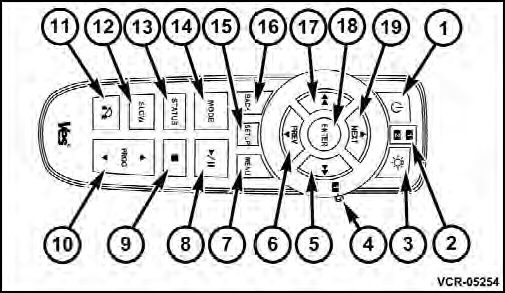
Controls And Indicators
1. Power – Turns the screen and wireless headphone transmitter for the selected Channel on or off. To hear audio while the screen is closed, press the Power button to turn the headphone transmitter on.
2. Channel Selector Indicators – When a button is pressed, the currently affected channel or channel button is illuminated momentarily.
3. Light – Turns the remote control backlighting on or off.
The remote backlighting turns off automatically after five seconds.
4. Channel/Screen Selector Switch - Indicates which channel is being controlled by the remote control. When the selector switch is in the Channel 1 position, the remote controls the functionality of headphone Channel 1 (right side of the screen). When the selector switch is in the Channel 2, position the remote controls the functionality of headphone Channel 2 (left side of the screen).
5.  – In radio modes, press to seek
the next tunable
station. In disc modes, press and hold to fast forward
through the current audio track or video chapter. In
menu modes use to navigate in the menu.
– In radio modes, press to seek
the next tunable
station. In disc modes, press and hold to fast forward
through the current audio track or video chapter. In
menu modes use to navigate in the menu.
6.  / Prev – In radio modes, press
to select to the
previous station. In disc modes, press to advance to the
start of the current or previous audio track or video
chapter. In menu modes, use to navigate in the menu.
/ Prev – In radio modes, press
to select to the
previous station. In disc modes, press to advance to the
start of the current or previous audio track or video
chapter. In menu modes, use to navigate in the menu.
7. MENU – Press to return to the main menu of a DVD disc, to select a satellite audio channel from the Station list, or select playback modes (SCAN/RANDOM for a CD).
8.  /
/
 (Play/Pause) – Begin/resume or
pause disc play.
(Play/Pause) – Begin/resume or
pause disc play.
9.  (Stop) – Stops disc play.
10. PROG Up/Down – When listening to a radio mode, pressing PROG Up selects the next preset and pressing PROG Down selects the previous preset stored in the radio. When listening to compressed audio on a data disc, PROG Up selects the next directory and PROG Down selects the previous directory. When listening to a disc in a radio with a multiple-disc changer, PROG Up selects the next disc and PROG Down selects the previous disc.
11. MUTE – Press to mute the headphone audio output for the selected channel.
12. SLOW – Press to slow playback of a DVD disc. Press
play (  ) to resume normal play.
13. STATUS – Press to display the current status.
14. MODE – Press to change the mode of the selected channel. See the Mode Selection section of this manual for details on changing modes.
15. SETUP – When in a video mode, press the SETUP button to access the display settings (see the display settings section) to access the DVD setup menu, select the menu button on the radio. When a disc is loaded in the DVD player (if equipped) and the VES™ mode is selected and the disc is stopped, press the SETUP button to access the DVD Setup menu. (see the DVD Setup Menu of this manual.).
16. BACK – When navigating in menu mode, press to return to the previous screen. When navigating a DVDs disc menu, the operation depends on the disc’s contents.
17.  – In radio modes, press to seek
to the previous
tunable station. In disc modes, press and hold to fast
rewind through the current audio track or video chapter.
– In radio modes, press to seek
to the previous
tunable station. In disc modes, press and hold to fast
rewind through the current audio track or video chapter.
In menu modes use to navigate in the menu.
18. ENTER – Press to select the highlighted option in a menu.
19.  / NEXT – In radio modes, press
to select to the
next station. In disc modes, press to advance to the next
audio track or video chapter. In menu modes, use to
navigate in the menu.
/ NEXT – In radio modes, press
to select to the
next station. In disc modes, press to advance to the next
audio track or video chapter. In menu modes, use to
navigate in the menu.
See also:
Dialing Using The Mobile Phone Keypad
You can dial a phone number with your mobile phone
keypad and still use the Uconnect™ Phone (while dialing
via the mobile phone keypad, the user must exercise
caution and take precautionary sa ...
Life Of Tire
The service life of a tire is dependent upon varying
factors, including, but not limited to:
• Driving style
• Tire pressure
• Distance driven
WARNING!
The tires and the spare tire should ...
NEUTRAL
Use this range when the vehicle is standing for prolonged
periods with engine running. The engine may be started
in this range. Set the parking brake and shift the transmission
into PARK if you ...