Headlamp
1. Raise and prop open the hood. Locate the connector behind the headlamp.
NOTE:
It may be necessary to remove the air cleaner
filter housing and position the totally integrated power
module aside prior to replacing the low beam headlamp
on the driver’s side of the vehicle.
2. Reach into engine compartment and from behind the lamp assembly and grasp the connector.
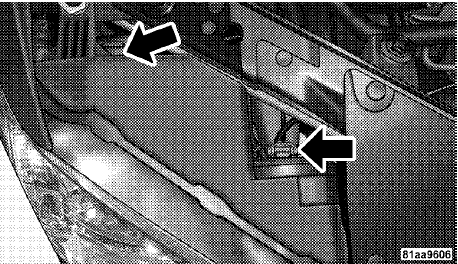
3. Rotate bulb and connector one-quarter turn and pull outward from assembly.

CAUTION!
Do not touch the new bulb with your fingers. Oil
contamination will severely shorten bulb life.
4. Pull the bulb out of the socket and replace the bulb.

5. If the bulb comes in contact with any oily surface, clean the bulb with rubbing alcohol.
6. Reinsert the bulb and socket assembly and rotate clockwise one-quarter turn to secure.
See also:
Vehicles Without Wheel Covers
1. Mount the road tire on the axle.
2. Install the remaining lug nuts with the cone shaped
end of the nut toward the wheel. Lightly tighten the lug
nuts.
WARNING!
To avoid the risk of forcing t ...
Towing With HSA
HSA will provide assistance when starting on a grade
when pulling a trailer.
WARNING!
• If you use a trailer brake controller with your
trailer, your trailer brakes may be activated and
deac ...
Distance To Empty (DTE)
Shows the estimated distance that can be traveled with
the fuel remaining in the tank. This estimated distance is
determined by a weighted average of the instantaneous
and average fuel economy, ...