Rear Tail, Stop, Turn Signal, Side Marker And Backup Lamp
1. Raise the liftgate.
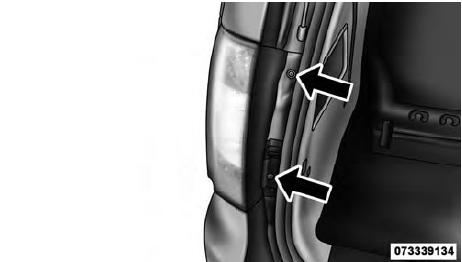
2. Remove the tail lamp assembly by removing the two screws from the inboard side. Use a fiber stick or similar tool to gently pry the light on the outboard side to disengage the two ball studs.
NOTE:
• If a screwdriver is used, make sure a soft material is
placed between the vehicle body and tool so not to
scratch the paint.
• The PRY location is best closest to the studs while
dislodging them separately.
3. Twist the socket and remove it from the lamp assembly.
4. Pull the bulb to remove it from the socket.
5. Replace the bulb, reinstall the socket, and reattach the lamp assembly.
See also:
Ride & Handling
Ride quality — an aspect where the last 300 excelled — remains good in either
trim level. The suspension soaks up bumps well, isolating the cabin most of the
time. Alas, it's no match for the ...
E-85 General Information
The information in this section is for Flexible Fuel vehicles
only. These vehicles can be identified by a unique
fuel filler door label that states Ethanol (E-85) or Unleaded
Gasoline Only. This ...
Headlights On With Wipers (Available With Automatic Headlights Only)
When this feature is active, the headlights will turn on
approximately 10 seconds after the wipers are turned on
if the headlight switch is placed in the AUTO position. In
addition, the headligh ...