Installing The Child Restraint Using The Vehicle Seat Belts
The seat belts in the passenger seating positions are equipped with an Automatic Locking Retractor (ALR) or a cinching latch plate to secure a Child Restraint System (CRS). These types of seat belts are designed to keep the lap portion of the seat belt tight around the child restraint so that it is not necessary to use a locking clip. The ALR will make a ratcheting noise if you extract the entire belt from the retractor and then allow the belt to retract into the retractor. For additional information on ALR, refer to “Automatic Locking Mode” description under “Seat Belts in Passenger Seating Positions” section. The chart below defines the seating positions with an Automatic Locking Retractor (ALR) or a cinching latch plate.
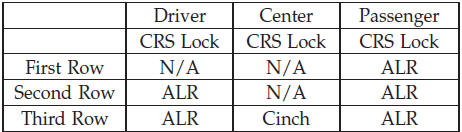
• N/A — Not Applicable
• ALR — Automatic Locking Retractor
Installing a Child Restraint with an ALR:
1. To install a child restraint with ALR, first, pull enough of the seat belt webbing from the retractor to route it through the belt path of the child restraint. Slide the latch plate into the buckle until you hear a “click.” Next, extract all the seat belt webbing out of the retractor and then allow the belt to retract into the retractor. As the belt retracts, you will hear a ratcheting sound. This indicates the safety belt is now in the Automatic Locking mode.
2. Finally, pull on any excess webbing to tighten the lap portion around the child restraint. Any seat belt system will loosen with time, so check the belt occasionally, and pull it tight if necessary.
Installing a Child Restraint with a Cinching Latch Plate:
1. To install a child restraint with a cinching latch plate, first, pull enough of the seat belt webbing from the retractor to route it through the belt path of the child restraint. Slide the latch plate into the buckle until you hear a “click.” 2. Finally, pull on any excess webbing to tighten the lap portion around the child restraint. Any seat belt system will loosen with time, so check the belt occasionally, and pull it tight if necessary.
See also:
Power Lumbar — If Equipped
Vehicles equipped with power driver or passenger seats
may be also be equipped with power lumbar. The power
lumbar switch is located on the outboard side of the
power seat. Push the switch forwa ...
Delete/Erase “All” Uconnect™ Phonebook Entries
• Press the button to begin.
• After the “Ready” prompt and the following beep, say
“Phonebook Erase All”.
• The Uconnect™ Phone will ask you to verify that you
wish to delete a ...
SET Button – To Set the Pushbutton Memory
When you are receiving a channel that you wish to
commit to pushbutton memory, press the SET button.
The symbol SET 1 will now show in the display window.
Select the button (1-6) you wish to lock ...