Installing The LATCH-Compatible Child Restraint System

Each vehicle, except commercial cargo vehicles, is equipped with the child restraint anchorage system called LATCH, which stands for Lower Anchors and Tether for CHildren. Two LATCH child restraint anchorage systems are installed on all second-row seats and in the center position on all third row fold-in-floor seats. Second-row seats also feature tether strap anchorages, located in the rear surface of the seatback. In addition, all third row fold-in-floor seats are equipped with a child restraint tether anchor at the center seating position.
NOTE:
• When using the LATCH attaching system to install a
child restraint, please ensure that all seat belts not
being used for occupant restraints are stowed and out
of reach of children. It is recommended that before
installing the child restraint, buckle the seat belt so the
seat belt is tucked behind the child restraint and out of
reach. If the buckled seat belt interferes with the child
restraint installation, instead of tucking the seat belt
behind the child restraint, route the seat belt through
the child restraint belt path and then buckle it. This
should stow the seat belt out of the reach of an
inquisitive child. Remind all children in the vehicle
that the seat belts are not toys and should not be
played with, and never leave your child unattended in
the vehicle.
• If your child restraint seat is not LATCH-compatible,
install the restraint using the vehicle seat belts.
Installing the Lower Attachments:
1. The vehicle lower anchorages are round bars located at the rear of the seat cushion where it meets the seatback.
2. Loosen the adjusters on the lower child restraint attachment straps (reference the child restraint seat instructions) to ease the installation.
NOTE:
It is recommended to loosen the top tether strap
and route it loosely prior to securing the lower anchors so
the top tether strap is not trapped between the vehicle
seat and child restraint.
3. Attach the lower child restraint attachment straps to the vehicle’s lower anchor bars. Ensure that the lower attachment strap is firmly engaged and that the hook is secure.
4. Tighten the lower attachment strap while firmly pushing the child restraint rearward and downward into the vehicle seat. Remove all slack in the lower attachment straps. Reference the child restraint instructions for information on properly removing slack.
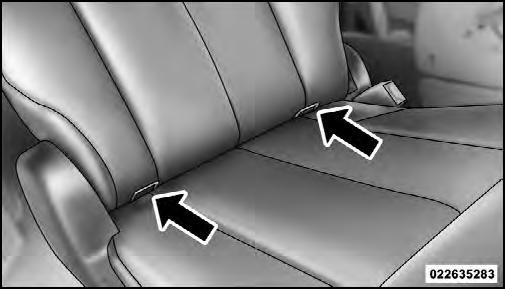
LATCH Anchorages (Second Row Anchorages Shown)
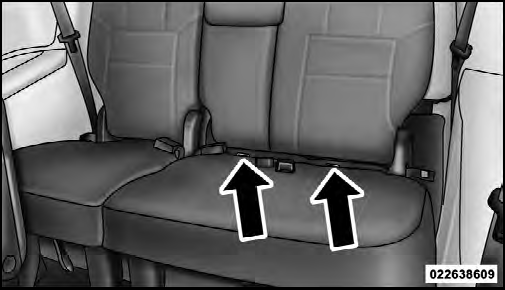
LATCH Anchorages (Third Row 60/40 Anchorages Shown)
Installing the Top Tether Strap (with either Lower Anchors or Vehicle Seat Belt):
1. Route the top tether strap under the adjustable head restraint between the steel posts.
2. Provide enough slack (reference child restraint instructions) for the tether strap to reach the tether anchor located near the bottom of the seat back.
3. Clip tether hook to tether anchor. Ensure that the hook is firmly engaged and secure.
4. Remove all slack and tighten tether strap according to child restraint manufacturer’s instructions.
NOTE:
The top tether strap is always to be secured,
regardless of if the child restraint is installed with the
lower anchors or the vehicle seat belt.
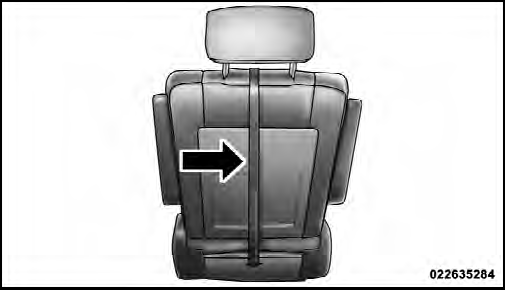
Rear Seat Tether Strap Mounting (Second Row Anchorage Shown)
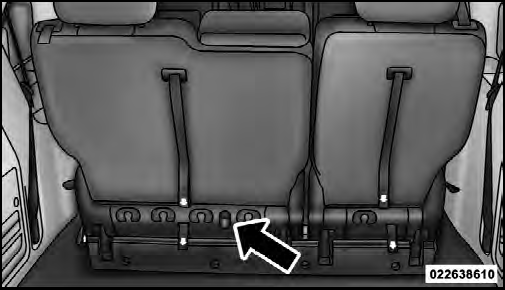
LATCH Anchorages (Third Row 60/40 Anchorage Shown)
WARNING!
An incorrectly anchored tether strap could lead to
increased head motion and possible injury to the child.
Use only the anchor positions directly behind the child
seat to secure a child restraint top tether strap.
See also:
Flash-To-Pass
You can signal another vehicle with your headlights by
lightly pulling the multifunction lever toward you. This
will turn on the high beam headlights until the lever is
released. ...
Open Air Driving in 30 Seconds Flat
On both soft and hard tops, the easy-to-use power convertible top folds in
three sections and automatically latches. Owners can drop the top with a switch
on the instrument panel, or with the pres ...
Fog Lamp
NOTE:
Access to the fog lamp bulb is from the rear of the
fascia. On the left rear side of the fascia, remove the push
pin and lower the hinged access door on the air dam.
1. From behind the bum ...